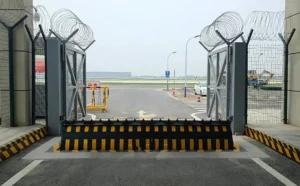
Road Blocker Installation and User Manua
Road Blocker Applications
Road blockers are widely used in high-security areas such as military bases, government agencies, highways, toll stations, airports, banks, and other locations with high security requirements. By restricting vehicle access, they effectively ensure traffic order and the safety of critical infrastructure and facilities. The road blocker manages the opening and closing of passageways by raising and lowering a movable gate. It can be integrated with electronic gate systems, parking systems, and other solutions, or used as a standalone device. It is primarily used in customs, military bases, government key departments, prisons, nuclear power plants, hydroelectric plants, ports, gas stations, oil depots, and logistics warehouses to control vehicle access in these special environments.
As a new type of anti-terrorism interception device, the road blocker (Hydraulic Road Blocker) is equipped with impact resistance and tire-popping features.It can quickly and effectively intercept vehicles attempting to break into checkpoints, ensuring the safety of high-security areas.This article introduces the installation of road bolacker, which is suitable for users who have already purchased the product or customers who want to purchase it for reference.
Road blocker installation tools required:
- Forklift (or Crane)
- Level Line, Level Gauge
- Measuring Tape, Nylon Rope
- Adjustable Wrench, Small Flathead Screwdriver
- Wire Stripper, Teflon Tape, Electrical Tape
Materials Required for Installation:
- Φ50 PVC pipe (Three-way Φ500, Elbow Φ50)
- 4-core, 4mm² cable (380V + neutral wire to control box)
- 3-core, 4mm² cable (Control box to hydraulic station motor)
- 4-core, 1.0mm² cable (Hydraulic station solenoid valve to control box)
- 4-core, 1.5mm² cable (Extension cord for submersible pump to 220V)
- Two hydraulic hoses (For connecting Road Blocker to hydraulic station)
Step-by-Step Installation Process and Debugging Requirements:
- Underground Inspection: Ensure the installation site is clear of underground obstacles such as electrical cables, water pipes, or fiber optic cables.
- Mark and Dig Foundation Pit: Mark the foundation pit location and dig according to the following dimensions: Length N + 500mm × Width 1500mm × Depth 1000mm (including a 180mm thick base layer).
- Prepare the Base: After digging the foundation, place bricks or cement blocks at the four corners of the pit. Lay 50mm PVC pipes and three-way connectors along the machine body for drainage.
- Install the Road Blocker: Lift the Road Blocker into the pit and adjust the horizontal and vertical alignment (the machine surface should be 5-10mm above the ground). Fill the base with concrete (200mm thick) to secure the machine.
- Hydraulic System Setup: Connect the hydraulic hoses (wrap hose connections with Teflon tape) and test the system to ensure proper operation.
- Final Inspection and Testing: Perform final adjustments to the level and conduct an electrical test to ensure proper functionality.
- Backfill and Restore Road Surface: Backfill the area with cement and gravel, ensuring the machine does not shift. Restore the road surface to its original condition.
Road Blocker Installation Diagram:

Construction Instructions:
The Road Blocker in the diagram has a length of 3000mm, with external dimensions of 3000mm x 1000mm x 820mm.
The foundation pit size is 3500mm in length, 1500mm in width, and 1000mm in depth.
The machine should be installed at a height of 5-10mm above the ground. Ensure proper drainage by connecting the drainage pipes to the Hydraulic Road Blocker body.

Drainage system construction instructions: Prevent the normal operation of the road blocker machine from causing splashing, rainwater backflow into the wire pipe, leakage, reduced service life, etc.
1. Drain into the municipal sewage pipe for natural drainage.
2. You can choose reinforced cement pipes (heavy, compression-resistant, strong load-bearing). Or reinforced plastic corrugated pipes (light, compression-resistant, low load-bearing).
3. Brick the reservoir yourself. (Time-consuming)
The above 2 and 3 points need to be waterproofed and installed with a float automatic pump (sewage pump)
Note: If the early installation is not standardized, the later maintenance will be troublesome. Please strictly follow the requirements of this instruction for construction, and be sure to confirm that it is correct before powering on and debugging; if you encounter any problems, be sure to turn off the power before checking.
For more details, please contact QiGong professional service team.


